Tuesday, November 13, 2012

Photo Book

Click here to view this photo book larger

Shutterfly offers exclusive layouts and designs so you can make your book just the way you want.

Friday, November 2, 2012

Sisters

Two of my favorite people in this world are my two youngest daughters. Among their amazing qualities is the way they keep their relationship with each other strong and vibrant even while they now live miles apart. While they both resided in the same home it was common to capture perfect pictures of the two of them together on a daily basis. What you see in the photos above is the way they lived every moment. Having the two of them in the same house was heaven everyday. Every girl deserves to have a sister as dear and true as Andi has in Amanda, and Amanda has in Andi.

Before they came to earth,
Andi and Amanda 
chose each other as
SISTERS.


I made this wood shape flower using a bit of scrap paper
from the Close To My Heart paper kit and using the technique
 I show in the post which follows this one. 

I love adding tulle, and ribbon, and bling.
I had no specific plans for this copper ribbon when I
picked it up just the other day at the sale at Archiver's. 
I decided it was a perfect touch of flourish for this page.

What is your favorite flourish for your pages?
I would love to hear from you.

Create something beautiful everyday!!!
Karen

Thursday, November 1, 2012

How To Decorate Chip Board Shapes With Any Paper Pattern


Wood shapes and chip board come in a vast variety of adorable options.
The frustrating part is that they seldom come in the
color or pattern to match my current projects.
 

Using my Fiskar exacto-knife, Tombow multipurpose glue, a cutting mat,
and a bit of patterned paper I will show you how I turn
this wood shape into a beautiful embellishments to match my project.


Since I want to show the green side of this paper I will glue
my wood shape onto the reverse side of the paper.


I like the controlled tip applicator of the Tombow Multipurpose glue.


I place the glue side down and gently add pressure to insure a secure
and even bond of paper and wood. Using a stylus
I clean up any glue oozing from the sides before it dries.


Using my Fiskar exacto-knife I carefully cut the paper close to the edges of the wood shape.


When I have completely cut around the shape
it is ready to be inked, misted, glittered, or added to my project just as it is.
This same technique works great with chipboard shapes and alphabets.

I would love to hear what techniques you use on chipboard and wood shapes.

Happy crafting!
Karen

Saturday, October 27, 2012

My Organized and Assessable Creative Room


Now that my scrapping stuff has an identifiable place to be kept, it is more likely that my crafting table will stay clean and uncluttered. I don't have the latest in matching and coordinated storage boxes and such, but I can easily see what I have and where things are. Since my room re-do I have used my die cutting tools more since I can see them. My stamps and inks are utilized now as they are in easy reach. My acrylic stamps are in one place making it a breeze to browse through them for the perfect inspiration.


I can SEE my ribbons!!!!!!

My recently purchased items can be hung on the grid walls in plain sight making it more likely they are used sooner than (years) later.

When I started my room make-over I did have the option to paint the walls. I do like wall painting, but I decided that if I took the time to paint walls I would set myself back at least a week and possibly lose the inner excitement I had at the time to organize. In a moments decision I decided that I wanted a workable place to scrap more than I wanted a beautiful place for my scrapbooking stuff.


 My freshest papers are where I can see them. Embellishments are in one area instead of hidden in multiple places. I am using tools that had been forgotten only because they had not been in sight.


One place for inks and stamps! Die cuts are in two places with 2x2 Quickutz in binders on one shelf and larger die cuts on the opposite wall still in view and assessable.


The sewing area still has some organizing opportunities, but I have already done more sewing the past 4 weeks than I had the previous 4 months. Andi's maxi dress still isn't done, but that's because I would prefer she be here when I work on it since I want it to fit her.


I personally like clear storage places.  I do like the beautifully appealing look of designer drawers and boxes, but I have found that for myself I am more creative when I can see the materials I have to work with. Anything that is still in a non-see through container will eventually be stashed in something I can see through. My crafting space does have room for improvement, but I love it the way it is at the moment.


One of my favorite additions is the ribbon bar. I still have three totes of ribbons which didn't fit on the bar I have, so I am on the lookout for another one at the $25 I paid for the first. I am also scouring the web for clever ways to display the rest of my ribbon.


Behind the open grid wall is where we keep food storage, yarn crafts, gift wrapping and misc storage.  The white cabinet holds art supplies and stationary. All my scrapbooking tools and supplies are in this main area and in view. I love it!! I am truly blessed to have my own big space to do one of the things I really love to do.

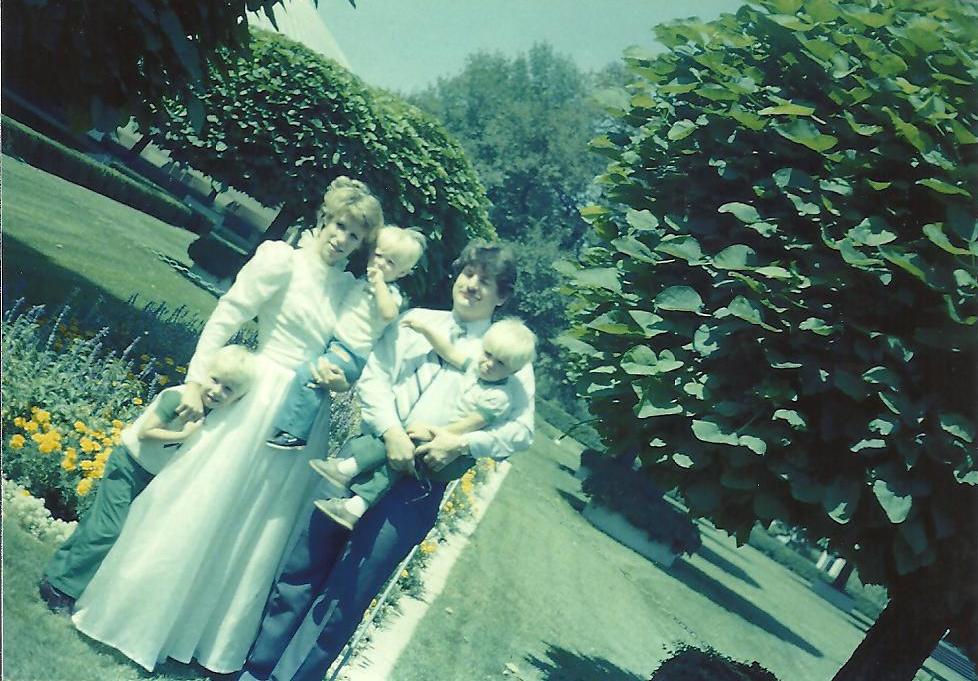
Wedding Day August 17, 1984

My daughters tease me that I do not have a wedding album made with pictures from when their dad and I were married. Well- That's because it never happened. It's all a made up story.

 The story that I have been telling my youngest three children is that their dad and I were married on August 17th in 1984. Our marriage was solemnized in the Salt Lake City Temple on a sunny, hot summer day.

My younger brother, Mark had taken photos and developed them onto slides. The only reason we do not view these pictures weekly at FHE is the fact that we do not own a slide projector.

A few years back (another time my daughters asked about the wedding photos) I had prints made from the slides. They turned out this blueish-green color. Bruce attempted to adjust the color, yet the results were not good. The pack of prints were tucked away until this past week when I came across them as I was searching for Christmas photos to put on some pretty new holiday paper I have recently purchased. (Yes, I needed MORE paper.)


Awe. Here is our little family. Jim is the little boy in green slacks with the argyle sweater vest. Chris is also in green. Chad is the little guy in the blue outfit. I am the gal in white, and Bruce has a caterpillar on his lip. :)

And we actually did get married  back in 1984.

Saturday, October 20, 2012

The Craft Room Table

The search for the ideal place to move when we sold our home on Carterville Road was a long and extensive task. My list of wants and must haves was short, but very specific. Luckily for me I had half a year to look for the 'perfect place' before our home sold and closed. The search actually took me THAT long.

Any of you who know my husband well, know that in the past he has lived by the motto, "Make a decision  even if it is wrong, just make a decision!". In comparison I believe that a person should take the time to make the best choice in the first place, so that you don't need to second guess it later. You can imagine our wonderful compatibility. It works- He lets me do the research and the planning, and tells me when he doesn't wish to give his opinion any more. Over the years he has developed patience and an appreciation of the end results.

So, back to what I was saying- One of the 'must haves' for my new home was a craft room large enough for my old dining room table. I am talking about the kitchen table my dad made for my mom when there were 13 kids at home. It is a long and massive thing sturdy enough to have survived 15+ people eating, rolling bread dough, cutting fabric, folding laundry, playing with play dough, reading the newspaper, paper mache-ing, canning fruit, doing homework, playing games, and who knows what else on. All that was just at my mother's house. As her household dwindled in size mine grew, so I was lucky enough to inherit the old kitchen table. In my home so much happened on that table. I painted wood crafts, spread out fabric and patterns, cut large pieces of Cordura from forty pound rolls of fabric, served large groups of teenagers large quantities of food, celebrated birthdays with a candlestick for each year, spread out business plans, scrap booked, and sometimes we even ate meals on that table.

In the most recent years more crafting and playing has been done on that table than eating. Our family was becoming small enough that a normal table would look better in our kitchen, so when we moved out of our old home and into a new place the plan was to do away with the monster of a table and replace it with a traditional 4-6 seater. With that plan in place I still could not part with my handy dandy crafting table. It needed a special place in my future home.

Ha-ha. With my diligent search I did find the perfect new home, plus a room large enough for my crafting table. Seriously, this is a special piece of furniture. The top is smooth and solid. The legs are strong and immovable. It takes two to three people just to move the pieces when it is disassemble. It is heavy! My husband agreed to take it apart to move it here, but I had to re-assemble it without him. You'd think I was asking him to wrestle a bear.

My crafting and creative life now revolves around that 'bear'. I am blessed to have a smooth and sturdy and massive place to spread out my creative mess. My old table makes me happy!

Here are a few pics of my creative space with my wonderful craft table taking up the majority of the floor. These photos will also serve as the 'before' pictures of my now organized crafting room. Do notice the mess and the piles of stuff needing a specific home. And yes, I did sometimes actually create in this mess. My next post will be me proudly showing off my improved and organized space.

Till then- tell someone you LOVE them!

Karen


Yup- my craft room is in the basement and the walls are unfinished.


Notice the ribbon holder still in it's box with the receipt still attatched? It is that thing leaning up against the wall under the Costco photo envelope taped to the wall near the center right. That was a Christmas present I gave myself last year.


Look! My crafting mat has nothing piled on it! (at least for the amount of time it takes to snap the picture). This room is used for painting, sewing, scrapbooking, gift wrapping, beading, card making, and various artistic endevours. The space behind the gridwall is for food storage and storage of additional crafting items such as rolls of Cordura, boxes of yarn, vintage clothes, art supplies, framing materials and long forgotten crafts.


See? The table top is thick. The legs are massive! A person can pound eyelets without jiggleing the table. The benches came as a package with the Bear. Benches seat more people. :)

Wednesday, October 17, 2012

Jayden Mckenzie Scott


This is the way I like to play with paper. I like to start with a photo of a beautiful person. Then add inspiring patterned papers, a bit of old fashioned cutting with scissors, maybe some die-cutting and paper folding, some inking around the edges, sprinkle in some bling, utilize some brass and buttons, and then place a bit more bling somewhere. The results? Artistically B-E-A-U-T-I-F-U-L!


Cutting out the designs from the pretty printed papers is one of my favorite things to do. This time I was inspired by this pretty 'Pemberly' paper collection made by Close To My Heart. The brass letters are from Making Memories (product I had on hand), Sizzix has the perfect die to make the pretty rosettes. A couple of the flower centers were made with the handy dandy Epiphany Crafts charm setting tool. The beautiful girl is my adorable grand daughter, Jayden. As you can see, I have wonderful product and tools to work with. The most important being the picture of the beautiful girl.